Creating a video with Zebracat is fun and simple! Here's a step-by-step guide to help you get started and create professional videos, all while keeping things simple and user-friendly.
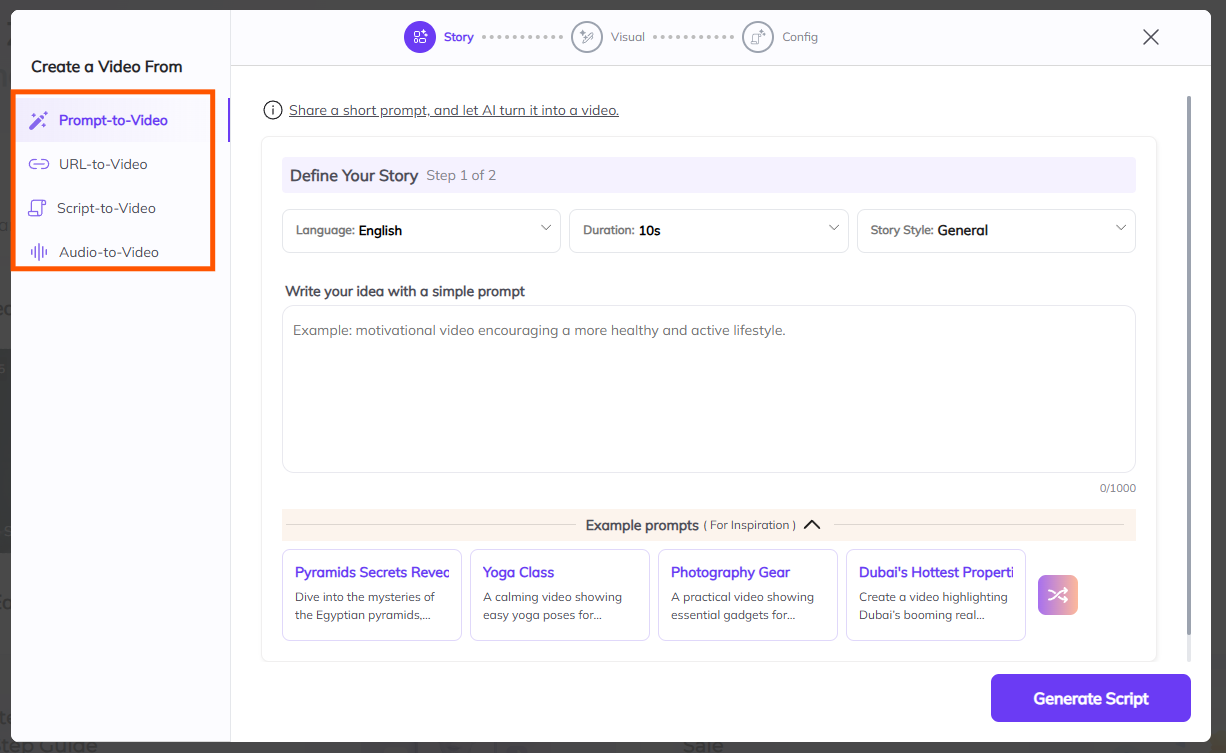
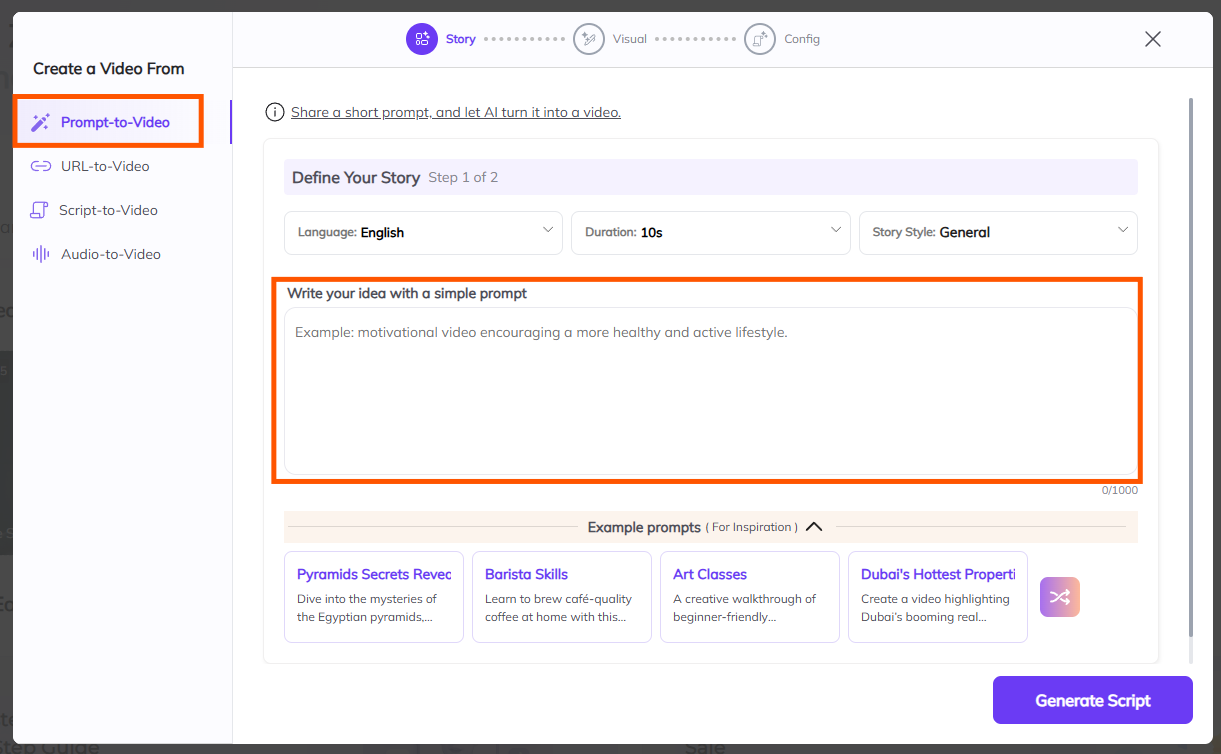
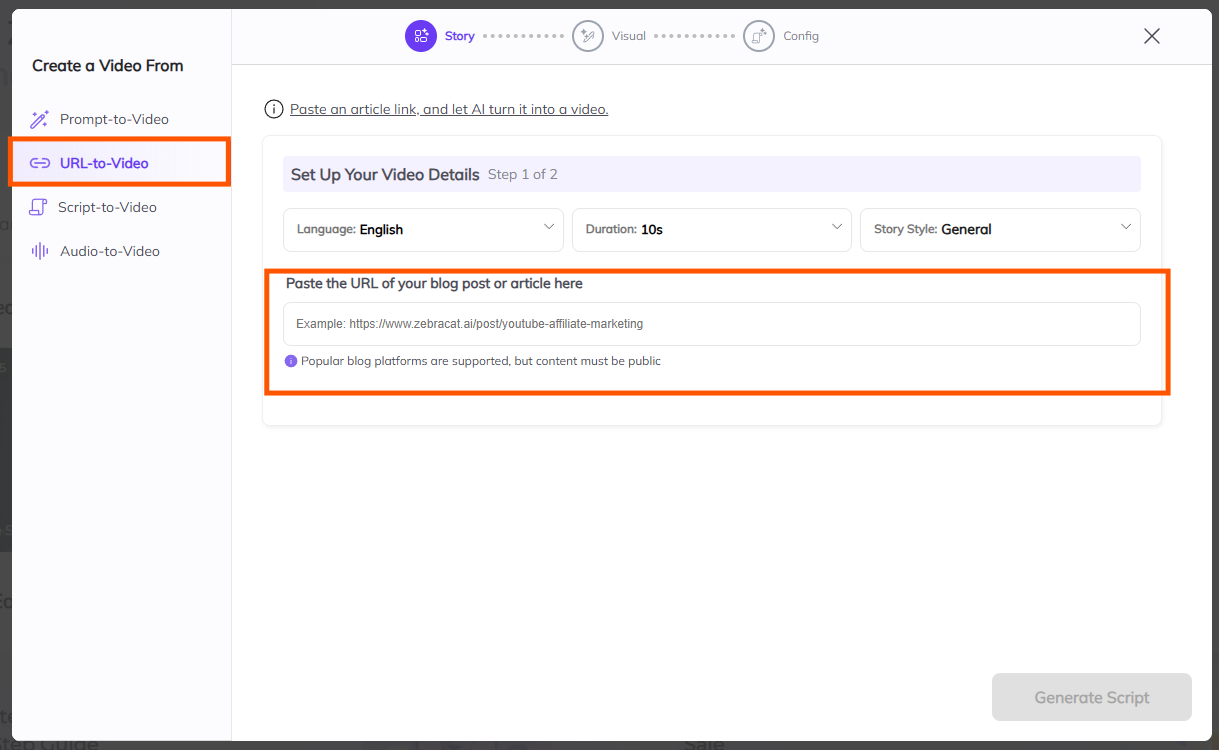
Start by choosing how you want to create your video from the options on the left:
Prompt to Video – Describe your idea in a sentence or two.
URL to Video – Paste a blog or article link to turn into a video.
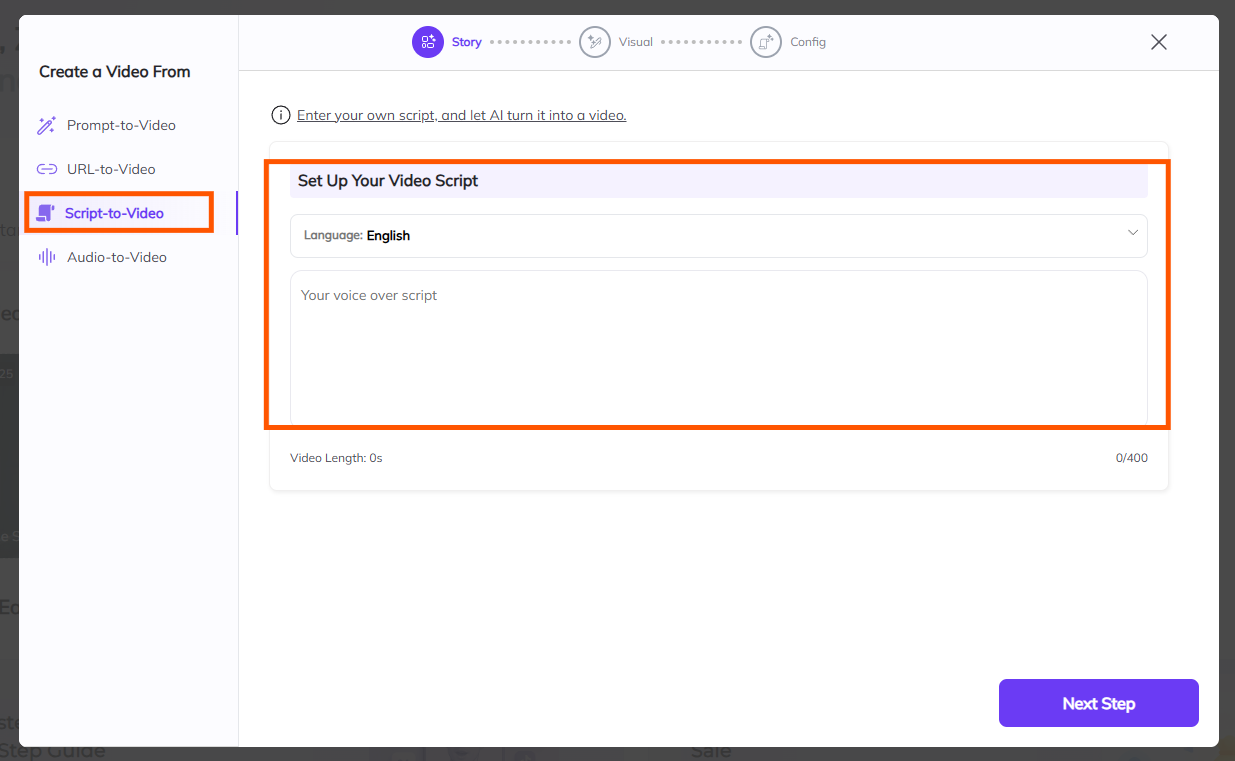
Script to Video – Use your full script to generate a video.
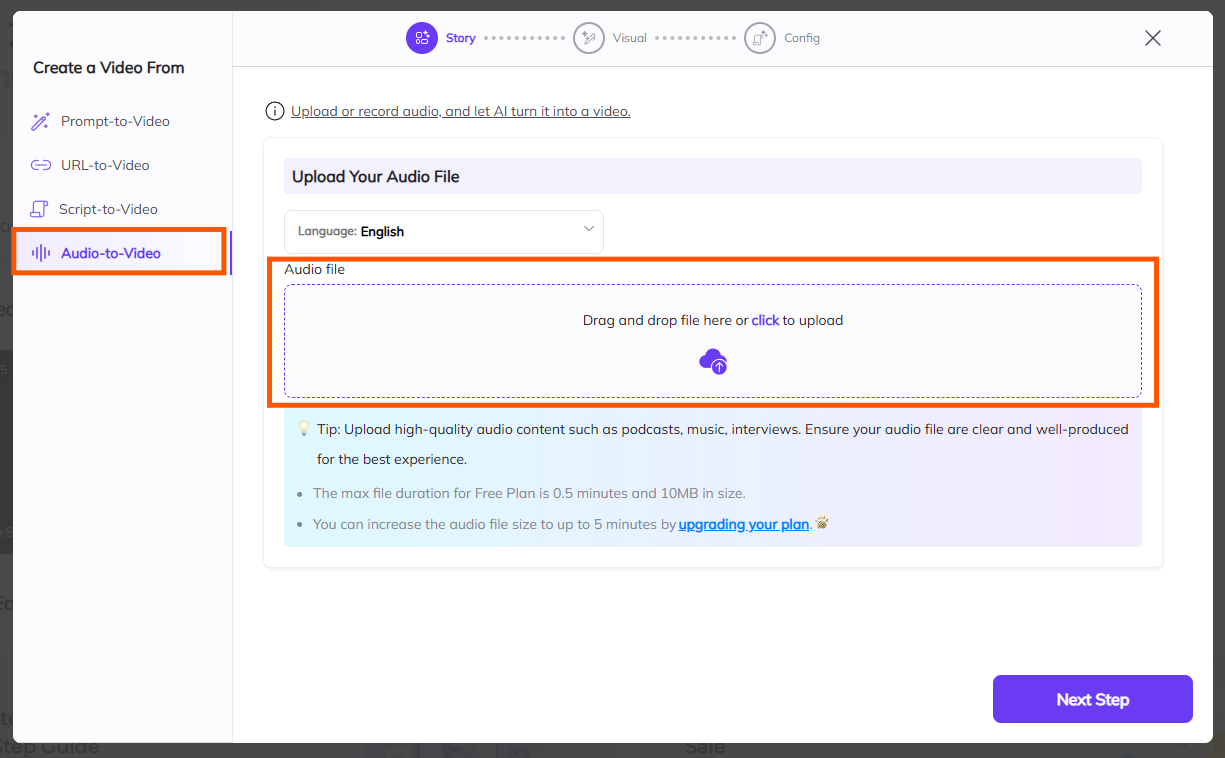
Audio to Video – Upload an audio file for the video to follow.
On the right side, set your language, video duration, and story style.
Use the prompt box to tell Zebracat what your video should be about — or pick an example to get started quickly.
Each workflow is designed to help you generate videos in different ways depending on your content and needs. Here's a quick guide to help you choose the best one for your project:
What It Is: This workflow allows you to input a simple prompt or short text, and Zebracat will automatically generate a video based on that text. The platform uses AI to create relevant visuals, voiceovers, and other elements that fit your prompt.
When to Use It: Ideal for when you have a simple idea or concept and want to quickly turn it into a video without writing a full script.
How It Works: You provide a brief description or prompt, and Zebracat will handle the rest, using its AI to select the right visuals, effects, and voiceovers.
What It Is: This workflow enables you to turn a URL (such as a blog post, article, or webpage) into a video. Simply input the URL, and Zebracat will automatically pull content from it to create a video.
When to Use It: Perfect for repurposing existing web content (like articles or blog posts) into videos, saving time on scriptwriting and video creation.
How It Works: Zebracat scans the URL for relevant text and then generates a video, pulling in AI visuals, voiceover, and text that matches the page’s content.
What It Is: If you have a fully written script, this workflow is the way to go. You upload your script (or copy-paste it), and Zebracat will generate a video using your script as the foundation. It will automatically match the script with relevant AI visuals, voiceovers, and effects.
When to Use It: Best for when you already have a well-thought-out script (e.g., sales script, marketing copy, or explainer) and want to quickly turn it into a professional-looking video.
How It Works: After you input your script, Zebracat automatically matches the content with AI-generated visuals and voiceovers, making the video creation process fast and seamless.
What It Is: This workflow allows you to upload an audio file (e.g., podcast, voiceover, or narrated script), and Zebracat will create a video based on that audio. It pairs the audio with relevant visuals and subtitles.
When to Use It: Perfect for turning audio content into a video format, such as podcasts, voiceovers for slideshows, or narrated storytelling.
How It Works: You upload your audio, and Zebracat will automatically generate visuals, captions, and matching effects based on the audio’s content, ensuring your video is synced with the sound.
Once you’ve picked your workflow, you’ll be ready to move forward with customizing your video’s details—like selecting the video ratio and finalizing the other elements!
Click "Generate Script" when you're ready to move to the next step.
After clicking "Generate Script," Zebracat will give you a few script options based on your prompt.
Read through the scripts and pick the one that best fits your story.
If you want to make changes, click the pencil icon to edit the text.
Not satisfied? Click "Regenerate Script" at the top to get new suggestions.
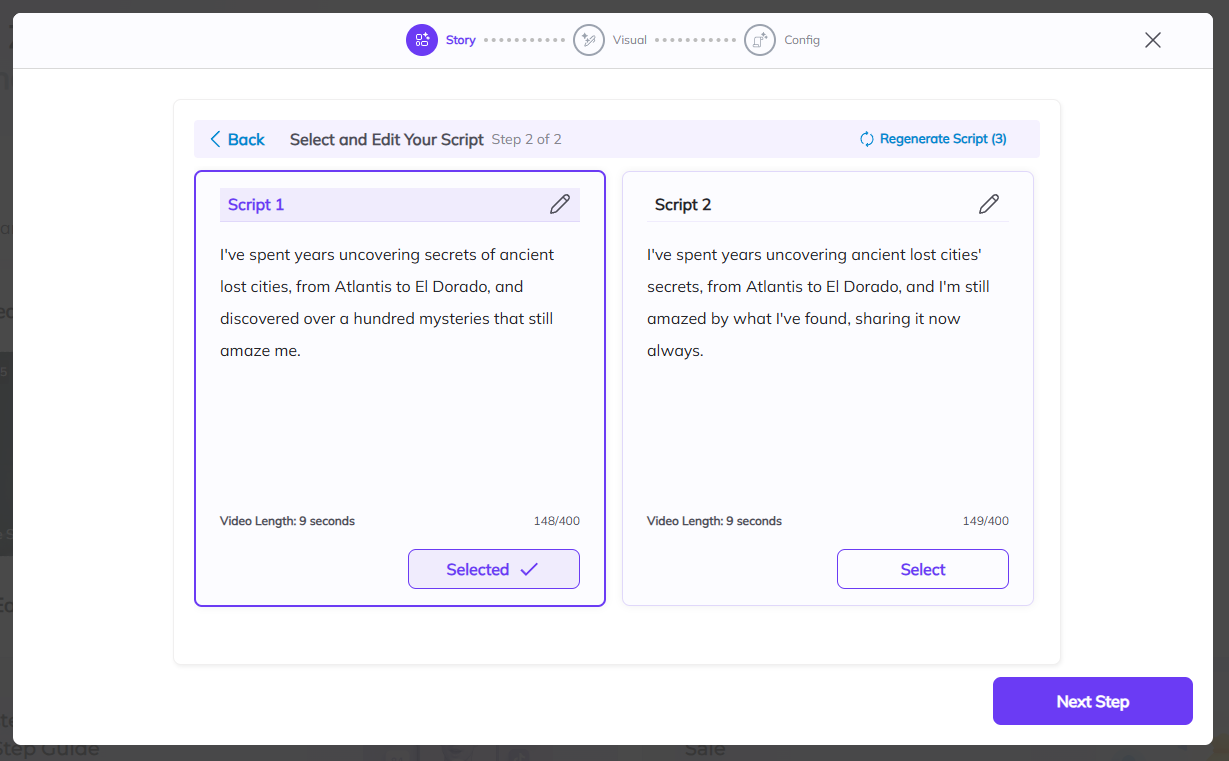
Once you’ve selected your favorite version, click “Next Step” to move on and start building your visuals.
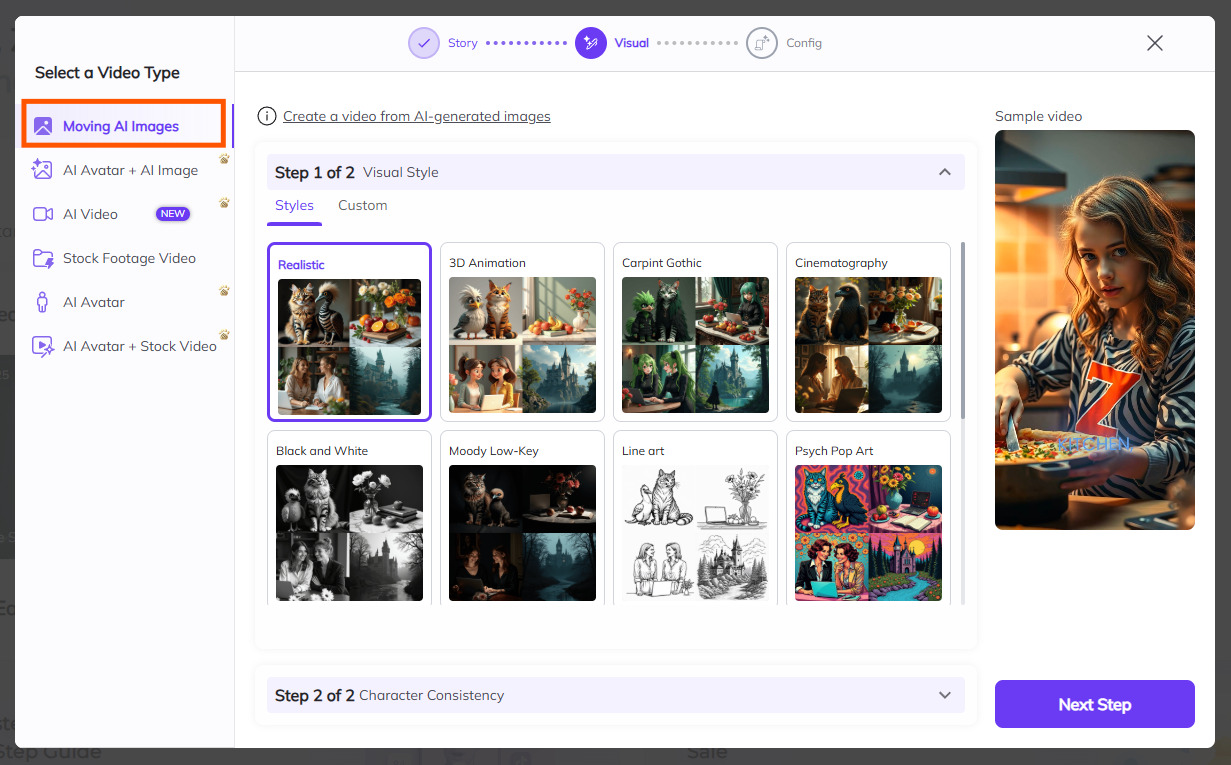
The third step in creating your video with Zebracat is deciding on the type of visual that will best suit your content.
This choice is crucial because it determines the look and feel of your video. Zebracat offers six options.
Each with its own unique style. Here’s a breakdown of what each one offers:
AI Image
What It Is: With this option, you can generate a single AI-created image in one of 78 different visual styles.
When to Use It: Perfect for static content where you want a visually striking, custom-made image to match your script or message.
Customization: You can curate the style to your specific needs—whether you want something abstract, realistic, or artistic.
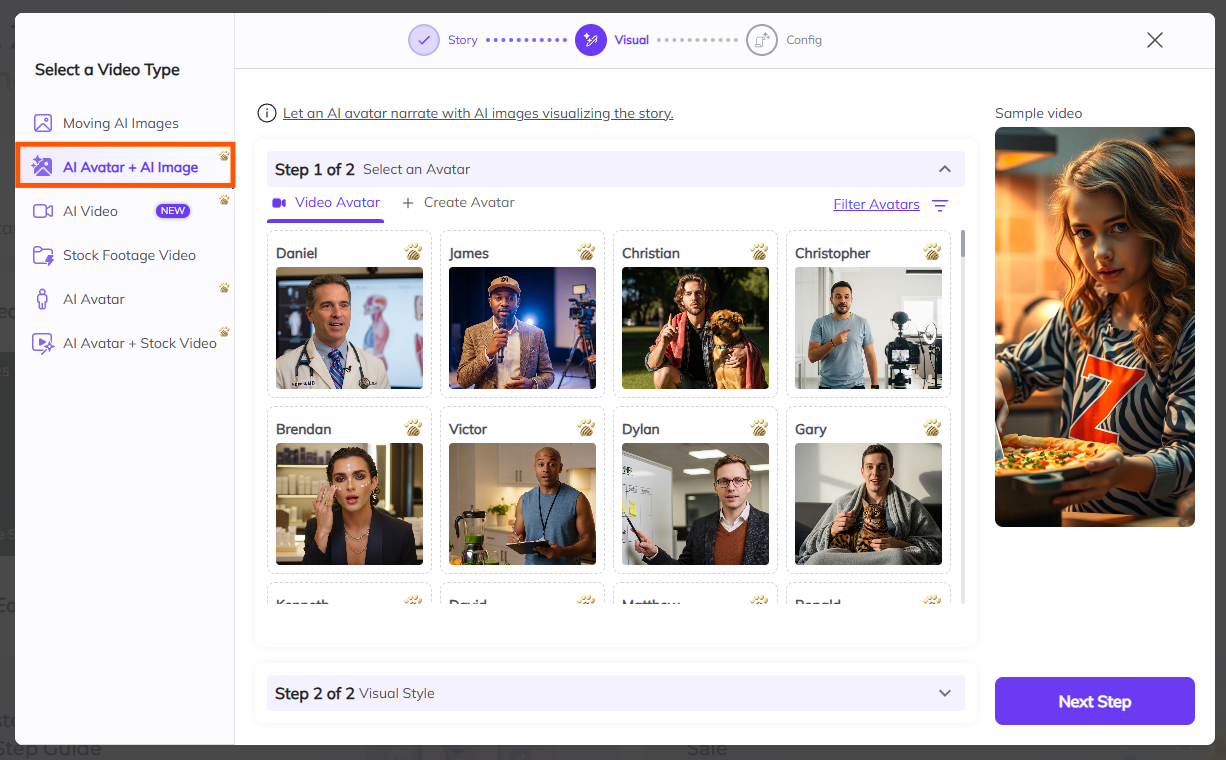
AI Avatar + AI Image – A talking avatar alongside custom visuals. Great for engaging presentations.
What It Is: This option lets you combine an AI avatar with AI-generated imagery. You get a talking avatar alongside the visual style of your choice.
When to Use It: Ideal for videos where you want to combine a digital personality (using Zebracat’s pre-made AI avatars) with compelling visuals to support your narrative. Zebracat offers a range of AI avatars that you can use directly, so you don’t need to create one yourself. This allows you to focus on telling your story, while the avatar and visuals work together to bring your message to life.
Customization: You can adjust both the avatar's looks and the background style, offering dynamic, engaging content.
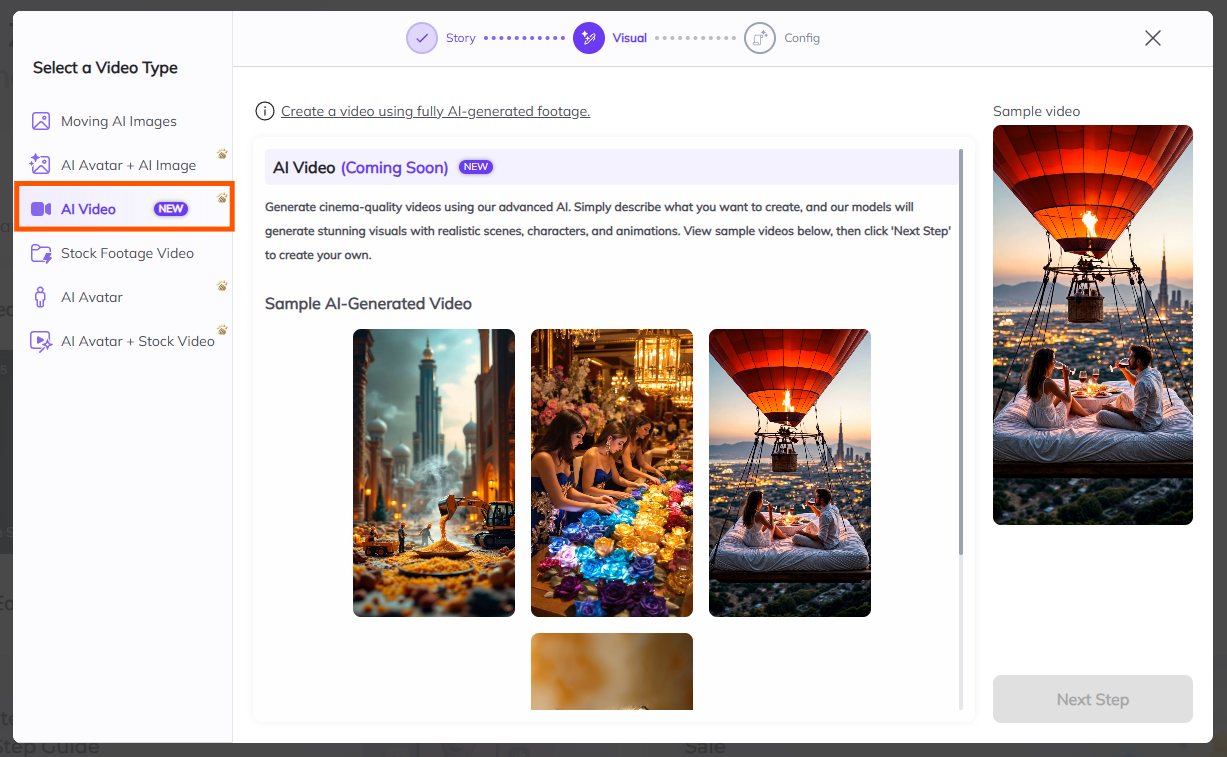
AI Video – Fully AI-Generated Scenes with Cinematic Quality
What It Is: AI Video uses advanced AI to generate entire scenes, characters, and animations from your script or prompt. The result is a fully AI-crafted video that looks cinematic and visually rich—no stock footage or real-world video needed.
When to Use It: Choose this when you want a completely original, movie-like video experience created entirely by AI. It’s ideal for storytelling, conceptual videos, futuristic themes, or when you want full creative freedom without using existing footage.
Customization: You define what you want through a prompt or script, and Zebracat’s AI generates scenes to match. While this feature is still in development, it will support stunning visuals, varied themes, and dynamic storytelling elements.
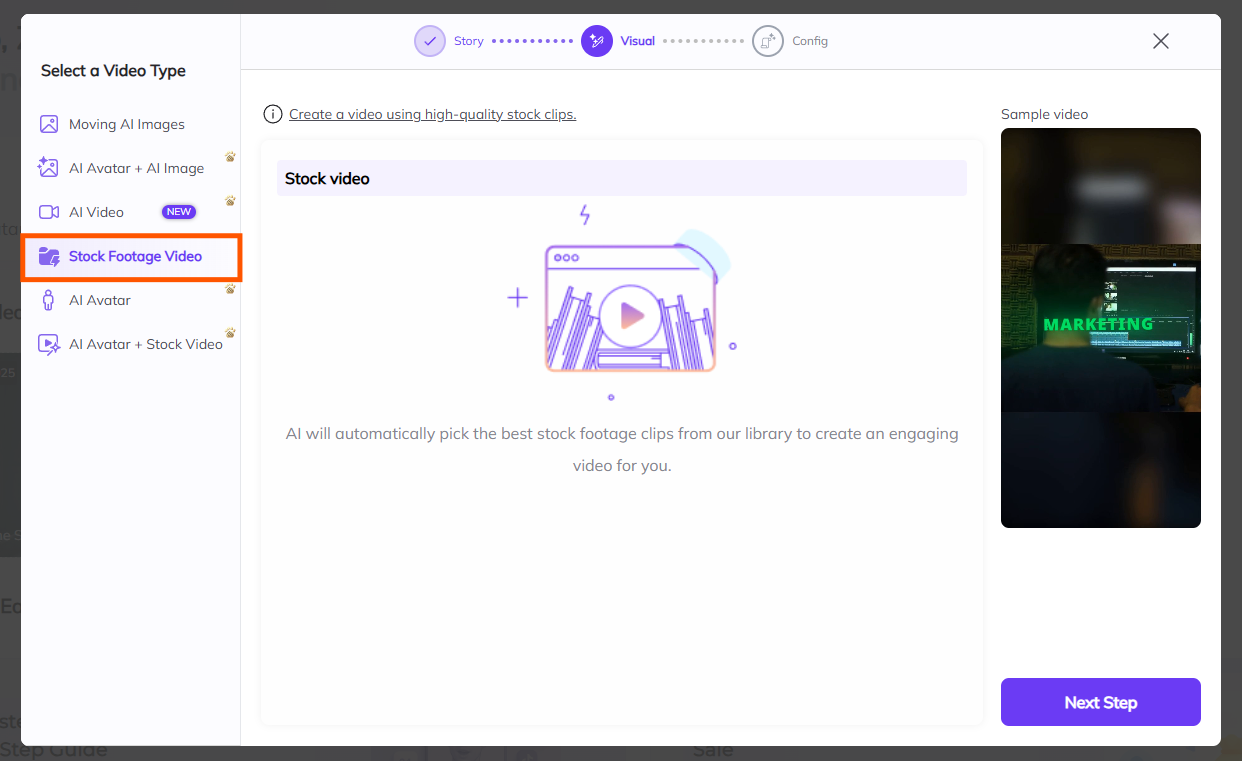
Stock Footage – Pre-recorded video clips; perfect when you don’t have your own footage.
What It Is: Stock footage allows you to use pre-recorded video clips in your content. These are high-quality video clips that cover a wide variety of scenes and themes.
When to Use It: Choose stock footage if you're looking for high-quality background video scenes but don’t want to shoot new footage yourself.
Customization: You can select from a wide range of categories, like business, lifestyle, nature, etc., to fit your video's tone and style.
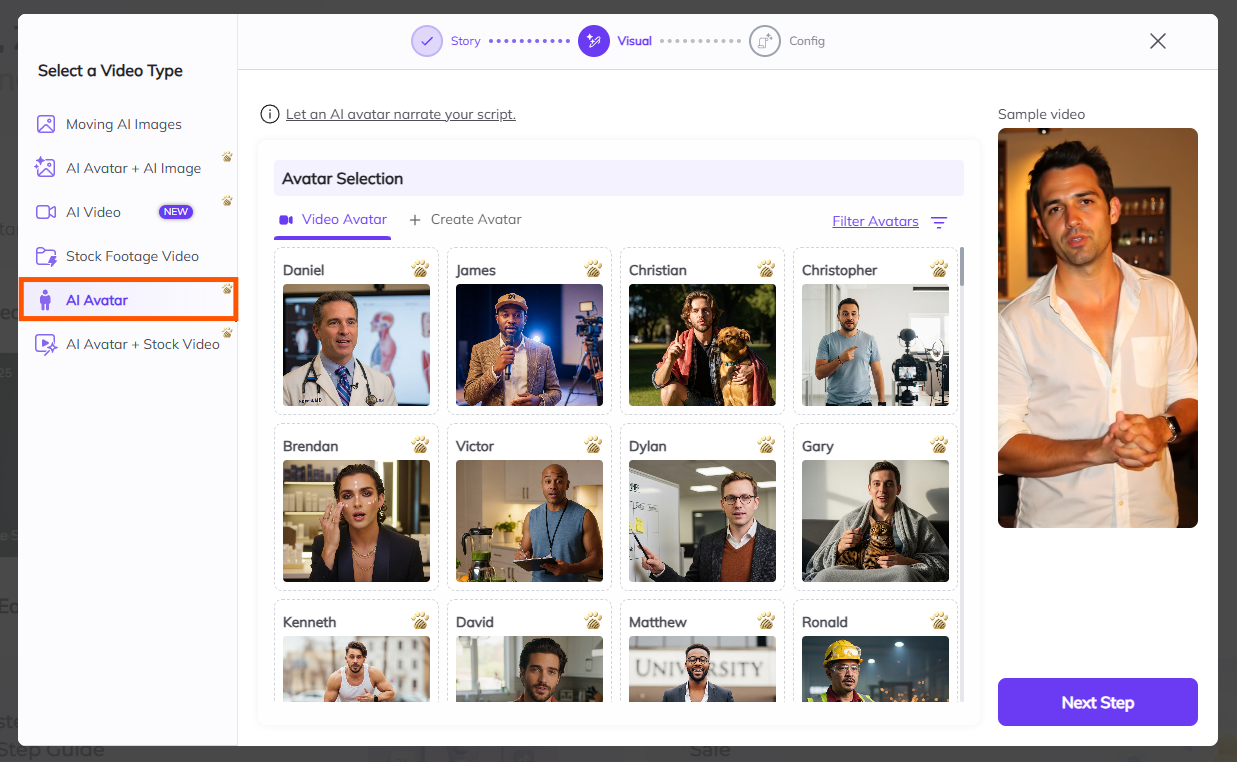
AI Avatar – A digital spokesperson for tutorials, explainers, etc.
What It Is: With this option, you can choose between a video or image avatar. You can also create your own custom avatar.
When to Use It: This is the go-to option for when you need a digital spokesperson. Whether it's for a tutorial, marketing video, or explainer video, an avatar can bring your content to life.
Customization: Choose from existing avatars or create one from scratch to match your brand’s personality.
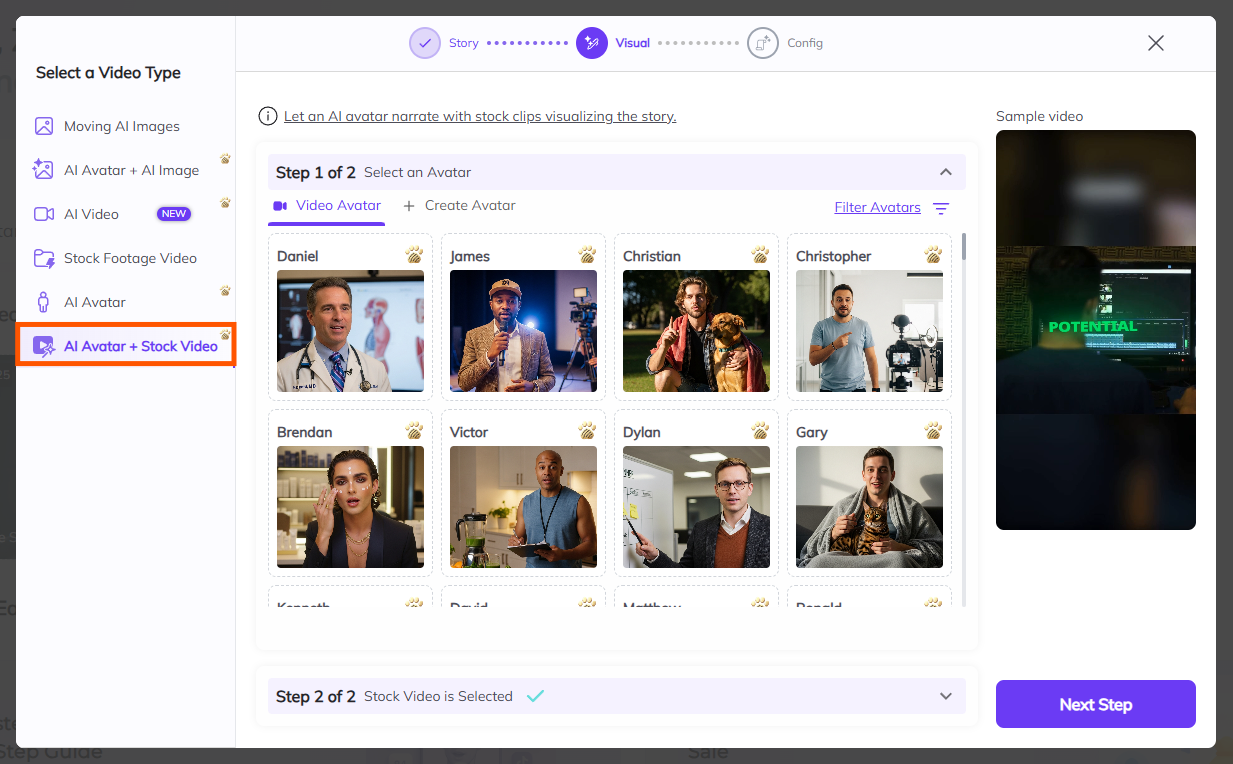
AI Avatar + Stock Footage – Combine a digital avatar with polished background scenes for a narrative-rich video.
What It Is: This combines an AI avatar (as your spokesperson) with stock footage. You get the best of both worlds: a digital personality plus engaging, professional-grade background scenes.
When to Use It: Ideal for creating unique, polished videos with a strong narrative. This option gives your video both a personal touch (through the avatar) and high-quality visuals.
Customization: Adjust the avatar and stock footage to fit your specific needs—choose the background video that complements the avatar's message and personality.
Notice:
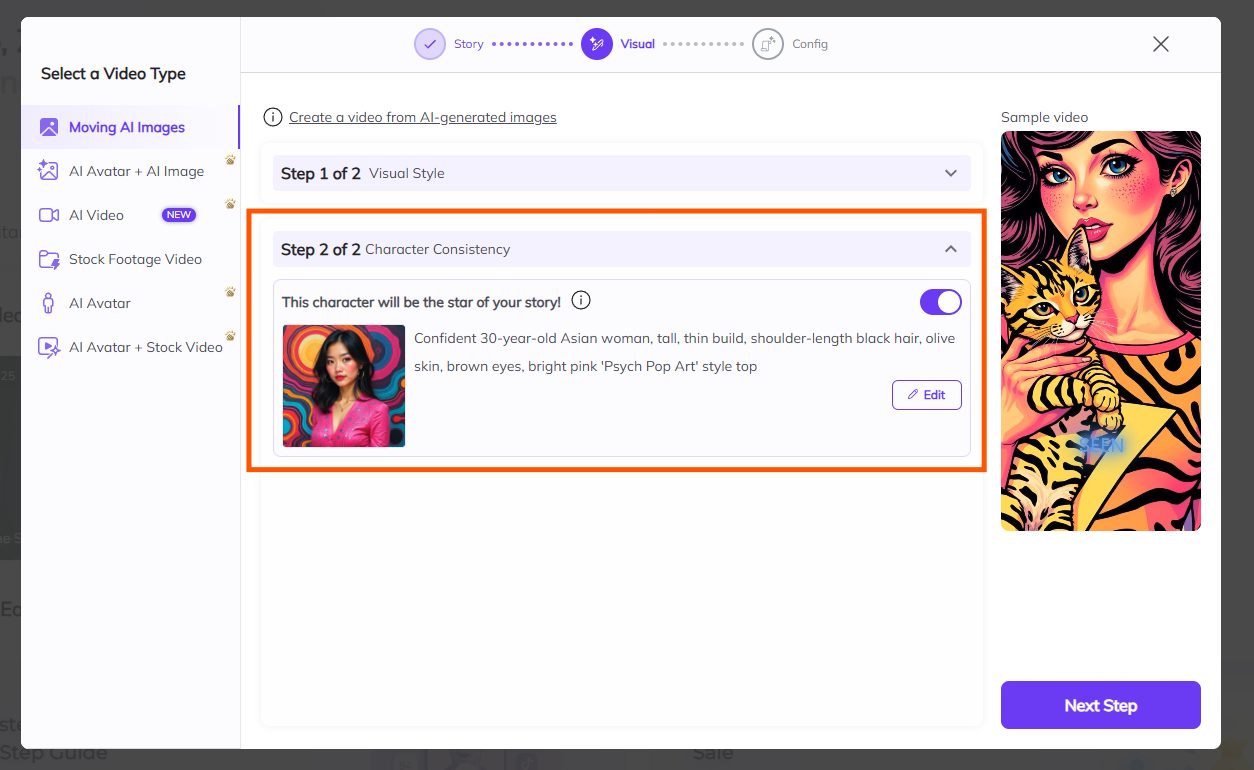
When using Moving AI Images or AI Avatar + AI Image, you can customize your visuals with a descriptive prompt.
To make sure your character looks the same throughout the entire video, enable Character Consistency. This keeps the appearance — including their face, hairstyle, outfit, and overall look — stable across all scenes.
Write a clear description of your character to guide the AI.
Click Edit if you want to change the character details.
This helps maintain a polished, professional look in your video by avoiding random or mismatched characters.
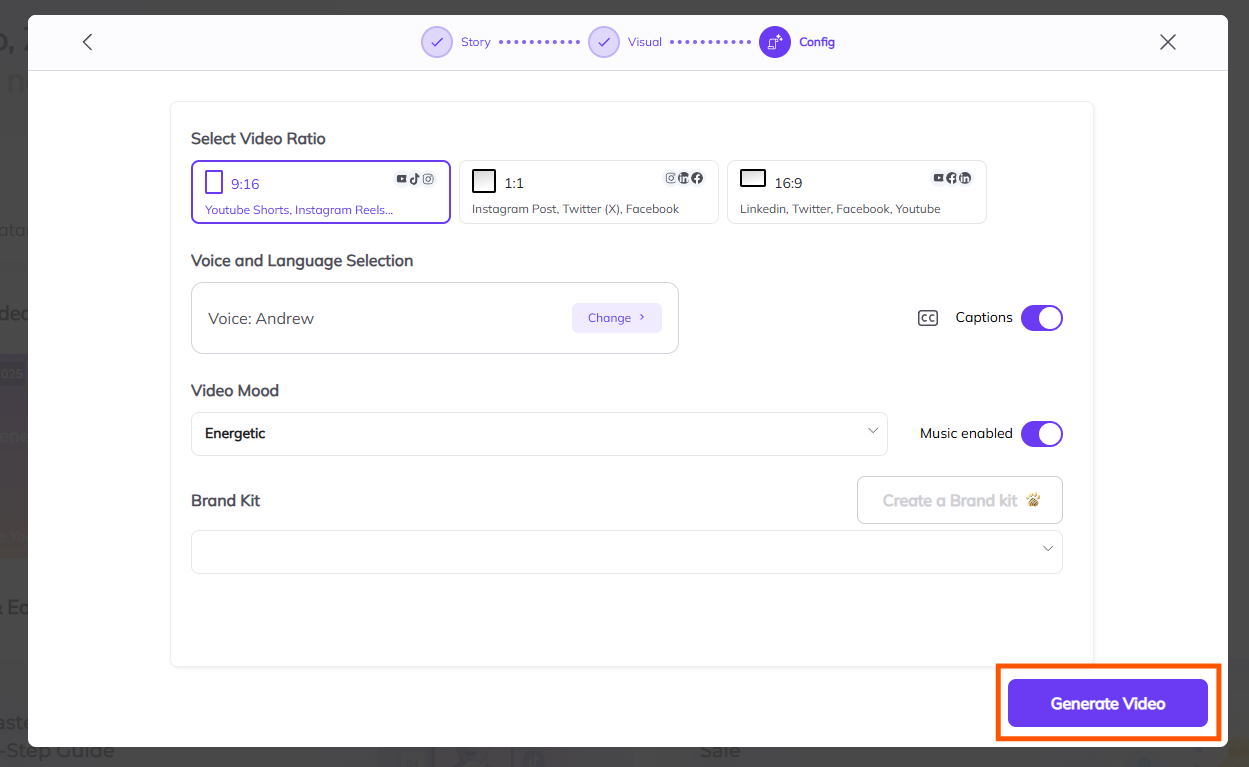
Choosing the right video ratio is essential to ensure your video looks great on the platform where it will be shared. Zebracat offers three aspect ratio options to suit various platforms:
Choose the ratio that best fits your target platform:
9:16 for vertical videos (YouTube Shorts, Instagram Reels, TikTok).
1:1 for square videos (Instagram Feed, Facebook, LinkedIn).
16:9 for landscape videos (YouTube, websites, presentations).
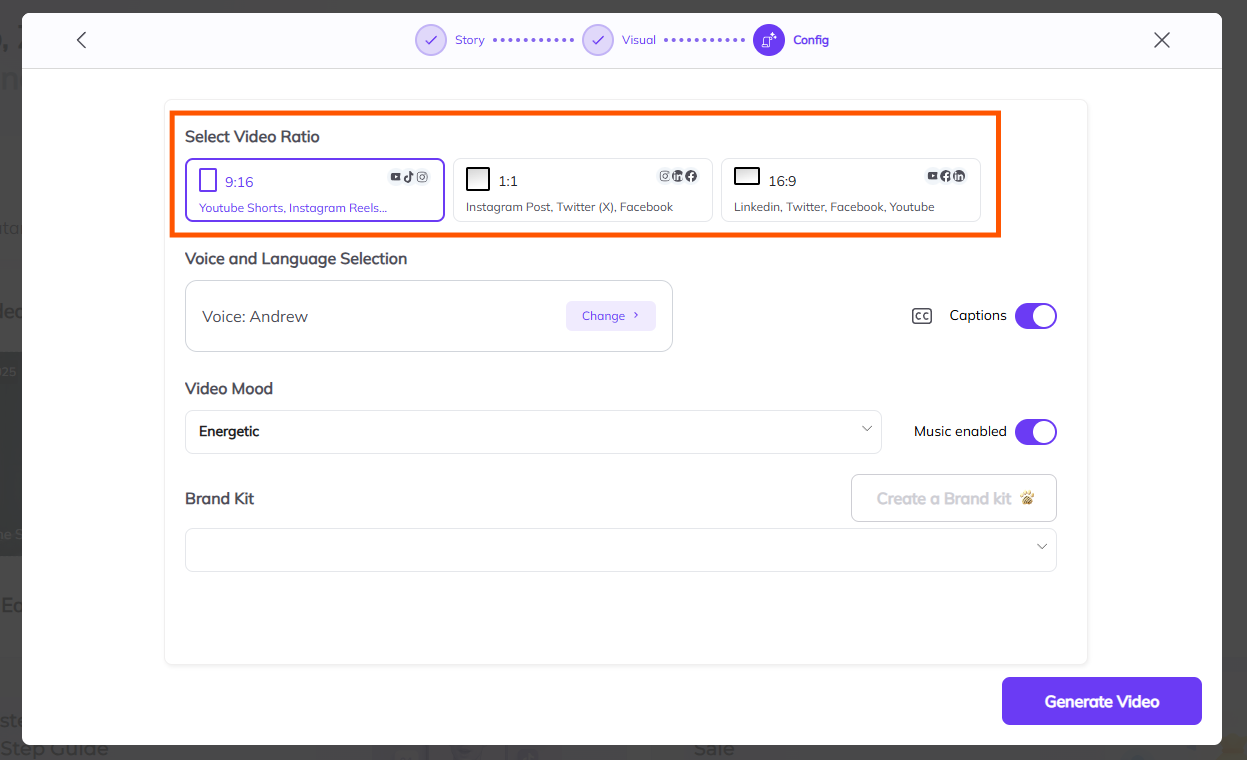
Don’t worry about the initial choice—you can resize the video later in the editor!
What It Is: This allows you to select the voice and language for your video’s narration. Zebracat offers a wide variety of languages, accents, and voice styles.
Options:
Standard AI Voices: Available for all users, including free memberships.
Ultra-Realistic AI Voices: Available for premium users. These voices provide a more natural and lifelike tone.
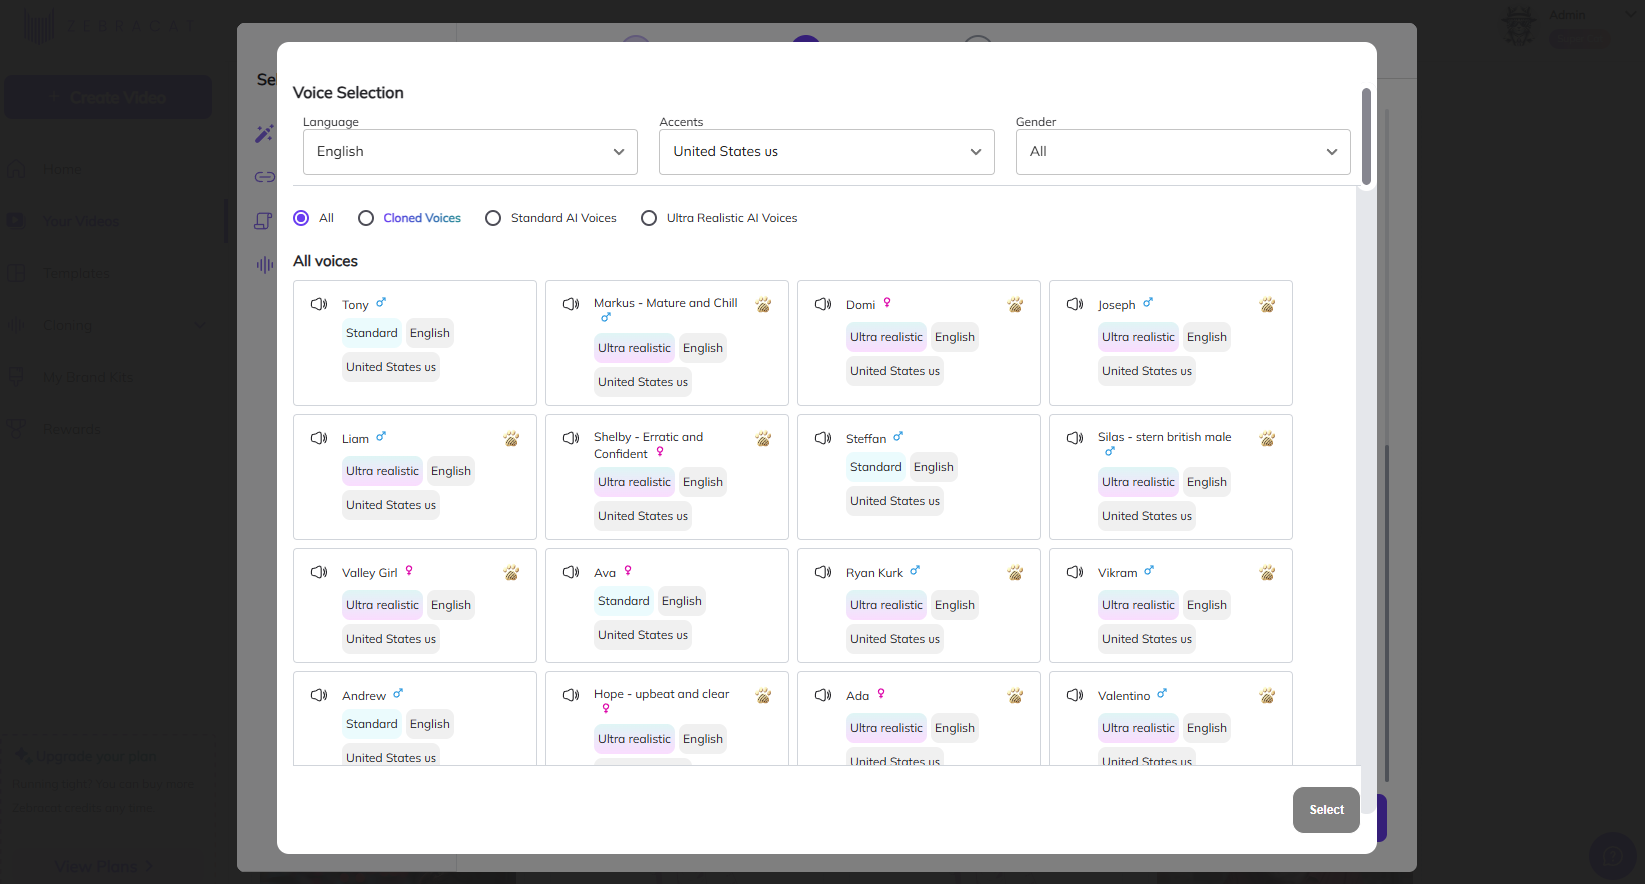
How to Choose:
Click on the voice options menu.
Preview different voices and listen to their styles.
Select the one that best matches your video’s tone and message.
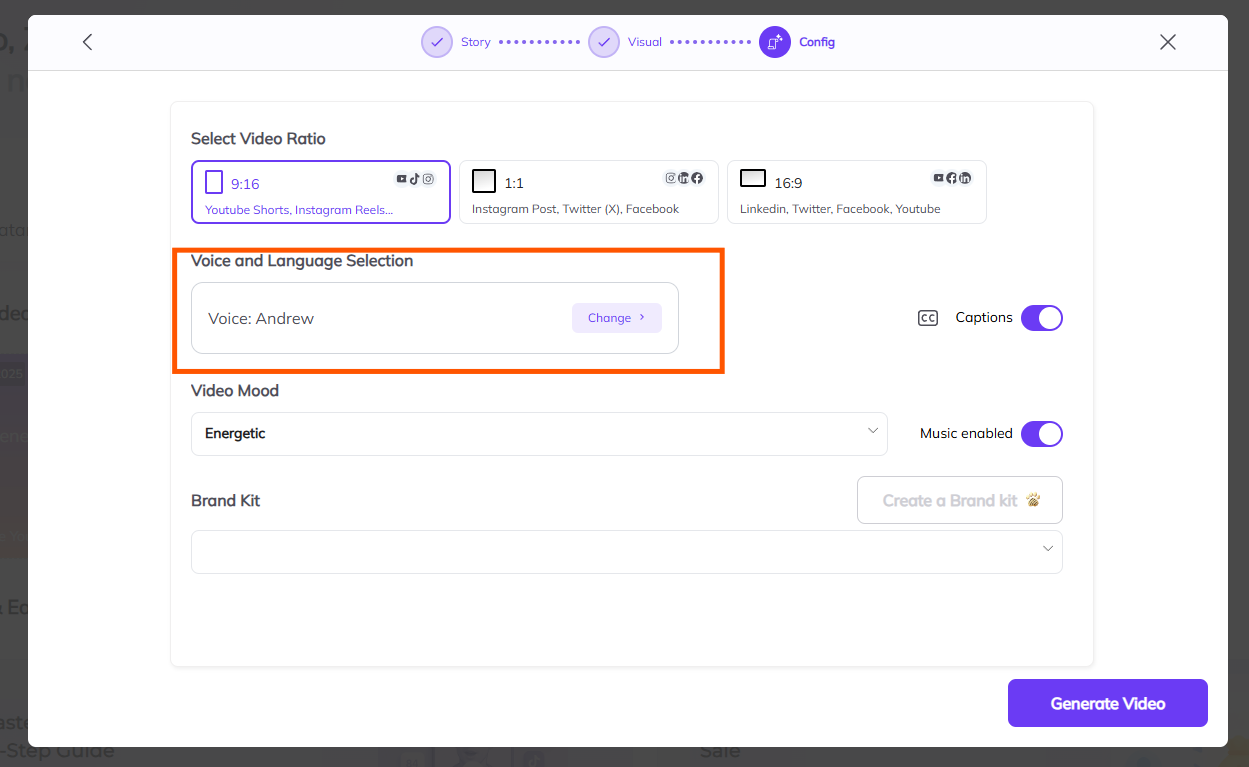
Why Use It: Picking the right voice enhances the overall quality of your video and ensures it resonates with your audience.
What It Is: Captions display text on-screen that matches the narration.
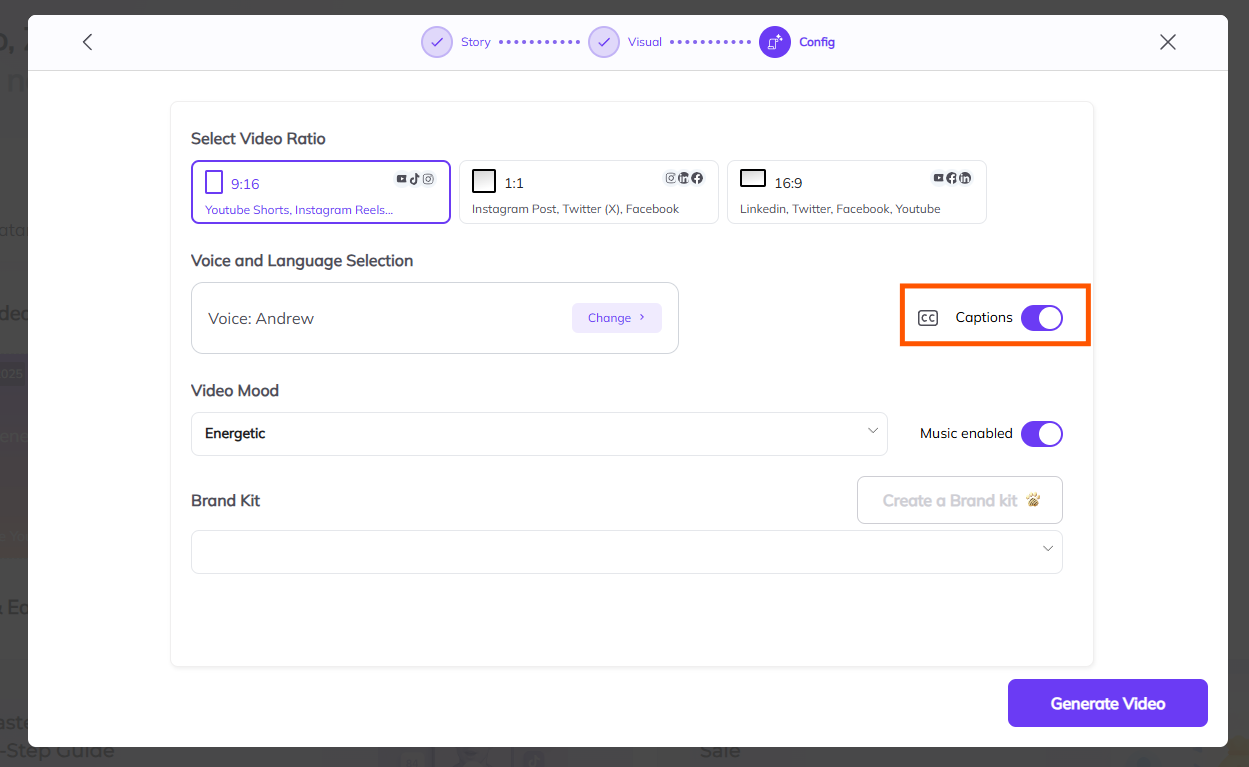
Why Use It:
Keep captions on for accessibility and to engage viewers who might watch without sound.
Turn them off if you prefer a cleaner video layout without text.
How to Set It:
Use the toggle to turn captions on or off. You can always edit or adjust them later in the video editor.
What It Is: Background music sets the emotional tone for your video, making it more engaging and memorable.
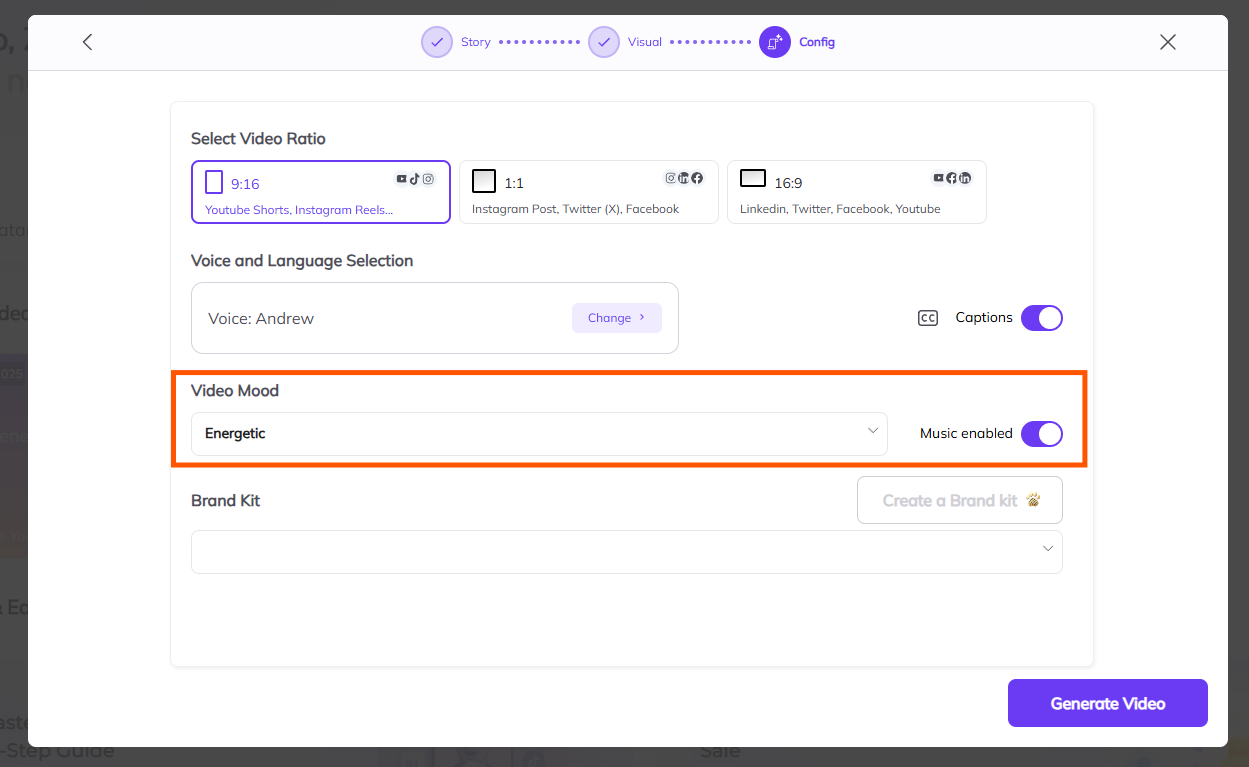
How to Choose:
Select the music genre that fits your video’s mood, such as energetic, happy, playful, or serious.
The AI will automatically pick a suitable track based on your choice.
If you prefer not to add music, simply click Off to skip this step.
Why Use It: Music enhances the viewer’s experience and keeps their attention.
However, don’t worry about making the perfect choice here—you can browse and select your exact music track later in the editor.
What It Is: This step allows you to include key branding elements such as your logo, color palette, and business name to maintain consistency with your brand identity.
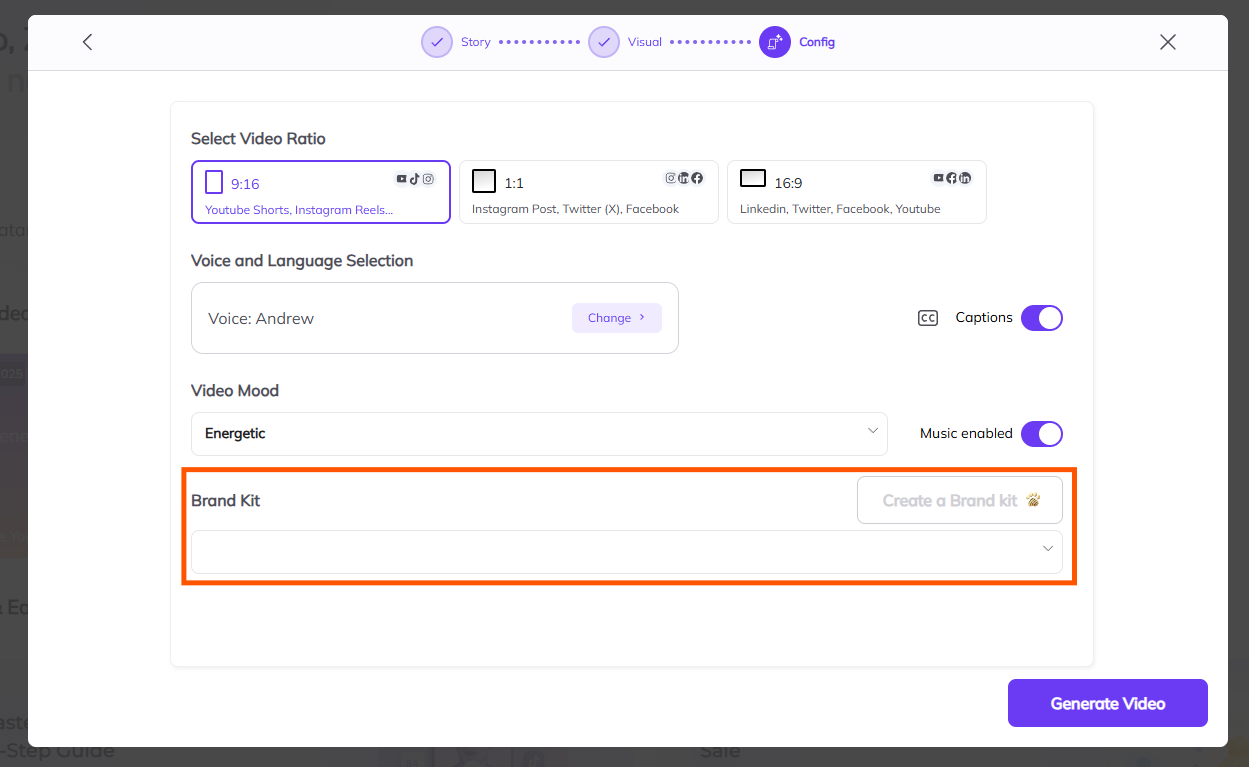
How to Set It:
Click to select a pre-prepared brand you’ve already created, or choose the option to create a new one by uploading your logo, setting a color palette, and entering your business name.
If branding isn’t needed, you can skip this step.
Once you’ve configured all your settings, click on Generate Video to finalize and start generating your video.
1. How can I change the voiceover?
You can modify the voiceover’s volume, tone, and speed in the editor by going into the audio settings. Just adjust the sliders to get it exactly how you want it.
Tip: Test the audio levels before finalizing your video to make sure it’s clear and not too loud or soft.
2. Can I use multiple avatars?
Absolutely! You can use multiple avatars in a single video, each appearing in different scenes or as needed.
Tip: This is great for adding variety to longer videos or when switching between characters.
3. Can I edit the video after creation?
No problem! You can always go back to edit the video. Whether you need to change the voiceover, avatar, or background, you can re-edit and regenerate the video as many times as you need.
Tip: Make sure you’re fully satisfied with the video before exporting it for sharing.
4. How do I upload extra media?
You can do this in the editor after the video is created. Just click on the Upload button in the editing section. You can upload any additional media files to add extra visual interest to your video.
Tip: Use high-quality images and videos that align with your video’s theme for the best results.
Need help editing? Check out this detailed guide: How to Edit Your Video